Good lighting is essential for a high-quality YouTube video. However, because cameras capture light differently than your eyes do, setting up lighting for your videos won’t be as simple as flipping the light switch on.
As you’re learning to light your videos well, you may not be prepared to invest in professional lighting equipment. You can still light your videos well by making use of what you already have.
First, take inventory of the light sources in your location.
As soon as you walk into the room you’re going to film in, examine all of the lighting sources that are readily available. Take note of not only the number of lighting fixtures but also the kind of light they emit. For example, fluorescent lights will look different on camera than a lamp with a bulb would.
You also need to examine the sources of natural lights. Where are the windows? Filming directly in front of a window will give your video poor lighting, but having the window to the side can bring in a good amount of natural light.
If you’re filming in a new location, then, ideally, you should visit it at the same time you plan to film. Use a sun tracking app to determine where the natural light will be coming from when you’re filming.
Next, think about minor changes you can make to your available light sources.
Getting more light for your videos can be as simple as changing the bulbs in your lamp. For example, if you were filming in your bedroom, you may sit near a lamp with a standard incandescent bulb. To make the light brighter, you could swap that bulb for an LED bulb.
Don’t limit yourself to the light sources already in the room. You might move a lamp from your living room into your bedroom when you film. Consider adding Christmas lights or fairy lights to the background for a softer glow.
You can also manipulate the light you have available by bouncing it. Many filmmakers use specialized reflective screens, but a cheap white poster board works well. Use the poster board to bounce light from a lamp or window onto your subject. You may need someone else to hold the board while you film.
Set up your lighting using the three-point structure.
Every vlogger should be familiar with three-point lighting. This classic cinema technique provides a simple framework for building out your lighting setup. You can manipulate the key light, fill light, and backlight to get the look you want.
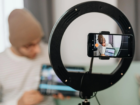
First, start with the key light. If you have a ring light, this is where it goes. Because the key light is the primary light source, it should illuminate the subject of your video directly. However, it should not be placed directly in front of your subject, which causes harsh shadows. Instead, place the key light a little to the side.
Next, illuminate the dark side of your subject with a fill light. As the secondary light source, the fill light controls the overall feeling of your shot. The brighter the fill light is, the more even the lighting will be. However, if you want a harsher shadow, then go for a dim fill light.
Finally, use a backlight to add dimension to your shot. Choose a light source that can be pointed at the back of your subject but kept out of shot. A higher light is good for this, so consider saving your tallest lamp for the backlight.
Control your light using diffusers and flags.
Now that you have plenty of light on your subject, it’s time to decide exactly how much of that light you actually want to use in the shot. Though your first instinct may be “the brighter, the better,” this is not always the case.
If your shot looks overexposed or too bright to match the look you want, you can cut it in one of two ways.
First, use a diffuser to cut the light directly from the source. A sheet makes a good diffuser. However, for safety reasons, try to hang the sheet in front of the light source rather than throwing it over the bulb. The effect will be similar to a softbox diffuser, so the quality of your light will change as well.
If you want to retain the hard quality of your light, cut it using flags. You can make your own flags using dark fabric or poster board. Block the light you don’t want coming in. For example, you could hang a dark blanket over a window that’s washing out your shot.
Whenever you’re setting up your camera, look through the lens to make sure the lighting looks the way you want it to. Build off the three-point lighting structure to get the effect you’re after. If you find yourself in need of a certain piece of equipment, try to find ways to DIY it first.
Interested in getting your YouTube video discovered by masses of targeted fans? Click this link: www.promolta.com
Kristen Harris enjoys listening to a wide range of music, from Taylor Swift to, on occasion, Celtic instrumental. She also spends her time writing, reading, and baking.